In the heart of many historic buildings lies an architectural gem: lath and plaster walls. Beyond mere construction, these plaster walls echo an era where craftsmanship and detail were paramount. The art of lath and plaster wall construction provides a nod to bygone days and represents a commitment to quality and charm. Yet, with all its durability, lath and plaster, like all things, present both advantages and challenges. We offer a comprehensive guide for those looking to breathe new life into old walls or restore them to their former glory.

Understanding Lath and Plaster Walls
Historical Context
Lath and plaster walls have graced many historic buildings. Originating in Europe, this method became the hallmark of houses built before the rise of modern plasterboard or drywall. This prevalence is not just a product of tradition but reflects the era’s commitment to craftsmanship.
Basic Construction
Traditional lath and plaster construction involves a delicate balance between wood lath and wet plaster.
Laths These are thin, narrow strips of wood, typically pine or oak. They’re nailed horizontally across the wall studs.
Plaster Application This begins with a scratch coat, pushed through the gaps between the lath strips to form plaster keys. As it hardens, it grips onto the wooden lath, anchoring the plaster. Subsequent coats, like the ‘brown coat’ or the ‘white coat’, are applied. Over time, these three layers which might well contain additional tradition additives such as animal hair solidify, resulting in a lath and plaster wall that’s both sturdy and aesthetic.
This method, while labour-intensive, yielded interior walls that provided better soundproofing and a texture hard to mimic with modern methods like plasterboard.
Restoring Lath and Plaster
Surface Preparation is Key
Embarking on the restoration of lath and plaster walls is much like rejuvenating a piece of classic art. The process requires patience, attention to detail, and, most importantly, a thorough surface preparation. Before diving into repairs or updates, ensuring that the wall is primed and ready is of paramount importance. Here’s a step-by-step guide to prepping your lath and plaster walls for restoration:
Cleaning
Start by gently removing any superficial dust and cobwebs using a soft-bristled brush. This will ensure a clear view of the wall’s current condition.
For areas with dirt or grime, use a damp cloth, ensuring it’s not too wet. Avoid using harsh chemicals or abrasive pads, as they can damage the plaster’s texture and finish.
Loose plaster bits should be cautiously chipped away. Remember, the goal is to create a stable surface, so be careful not to cause further damage during this process to the plaster wall surface.
Assessing Damage
With the wall cleaned, the next step is to conduct a thorough inspection. Look for visible cracks, holes, or areas where the plaster is bulging or sagging.
Tap gently on different parts of the wall. A hollow sound might indicate areas where the plaster has separated from the laths. These sections will need special attention during the restoration process.
Note any water stains or discolouration, as these could hint at underlying issues like leaks that need addressing before restoration.
Stabilising
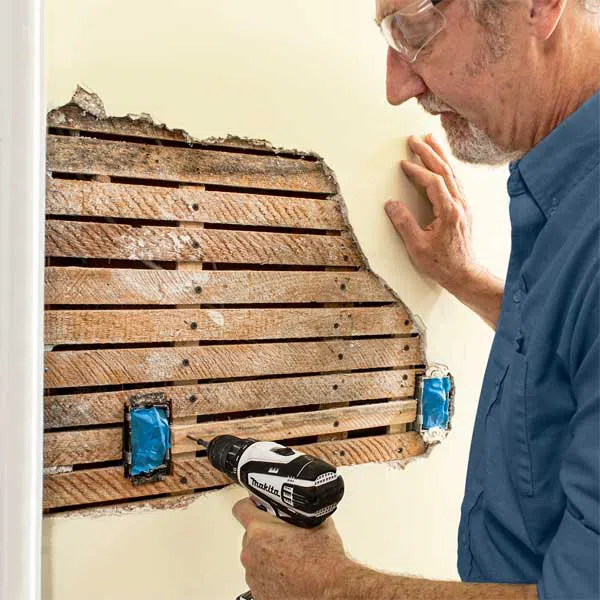
The laths – the typically wooden strips behind the plaster – serve as the backbone of the wall. It’s vital to ensure they are still robust and securely attached.
A loose wooden lath or a damaged metal lath might need re-nailing or even replacement. When replacing, aim to use materials that are consistent with the original to maintain the wall’s historical integrity.
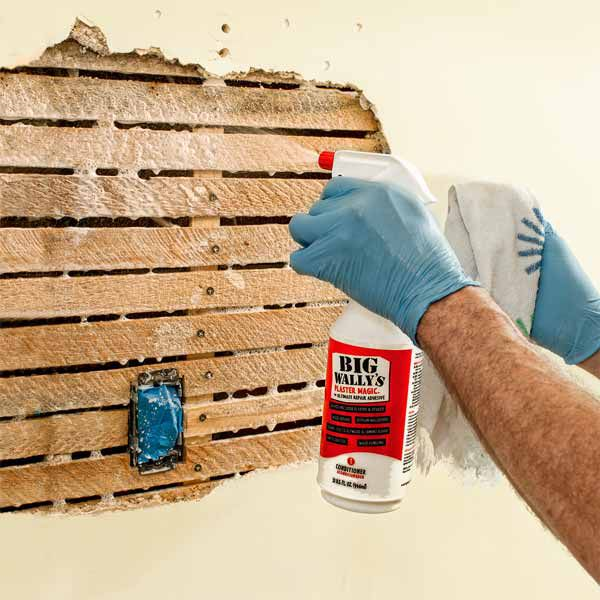
If there are areas where the plaster has separated from the laths but is still in good condition, adhesive can be injected to bond them back together. This can save substantial repair time and maintain the original plaster.
Choosing the Right Materials for Restoration
Restoring the grandeur of lath and plaster walls isn’t merely about the techniques; it’s equally about selecting the right materials. The quality and compatibility of the materials you use play a pivotal role in determining the longevity and finish of the restoration. Here’s a breakdown of what you should consider:
Plaster Mixtures: Types and Their Uses
- Lime Plaster Traditionally used for centuries, lime plaster is breathable, reducing the risk of trapped moisture and subsequent damage. It’s ideal for older homes, as it offers flexibility, which can accommodate subtle structural movements without cracking.
- Gypsum Plaster Faster setting than lime, gypsum plaster provides a smooth finish. It’s less flexible, so it’s more suited for newer structures or those with minimal movement.
- Composite Plasters These are mixtures of both lime and gypsum, offering a balance of flexibility and setting speed. They’re useful for a broader range of applications and can be a good middle-ground option.
Tools: Recommendations for a Professional Finish
- Trowels A stainless steel finishing trowel is essential for applying and smoothing out plaster. For corners and tighter spaces, consider an angle trowel.
- Lath Hammer Designed specifically for lath and plaster walls, this tool is perfect for both stripping away old plaster and fitting new laths.
- Plasterer’s Hawk This hand-held platform helps hold your plaster as you work, ensuring you can apply smoothly and consistently.
- Mixing Bucket and Paddle To achieve a consistent plaster mix, use a robust mixing bucket and an electric paddle mixer. Hand mixing can work, but it’s more labour-intensive and might not yield as consistent results.
- Safety Gear Protecting Oneself During the Restoration Process
- Goggles Plaster particles can irritate the eyes; always wear safety goggles to prevent this.
- Dust Mask Breathing in plaster dust can be harmful. A good quality dust mask or respirator ensures you’re not inhaling these particles.
- Gloves To protect against both abrasions and any caustic elements in the plaster, wear durable gloves.
- Coveralls Protect your clothing and skin from plaster splashes with a pair of coveralls. They also make cleanup easier, as you can simply remove them post-restoration.
Armed with the right tools and materials and wearing suitable safety gear, you position yourself to achieve the coveted flawless finish—a restoration that not only looks professional but stands the test of time. Remember, cutting corners might offer temporary savings, but in restoration, quality and compatibility are invaluable.
Steps to a Flawless Finish: Restoration Techniques
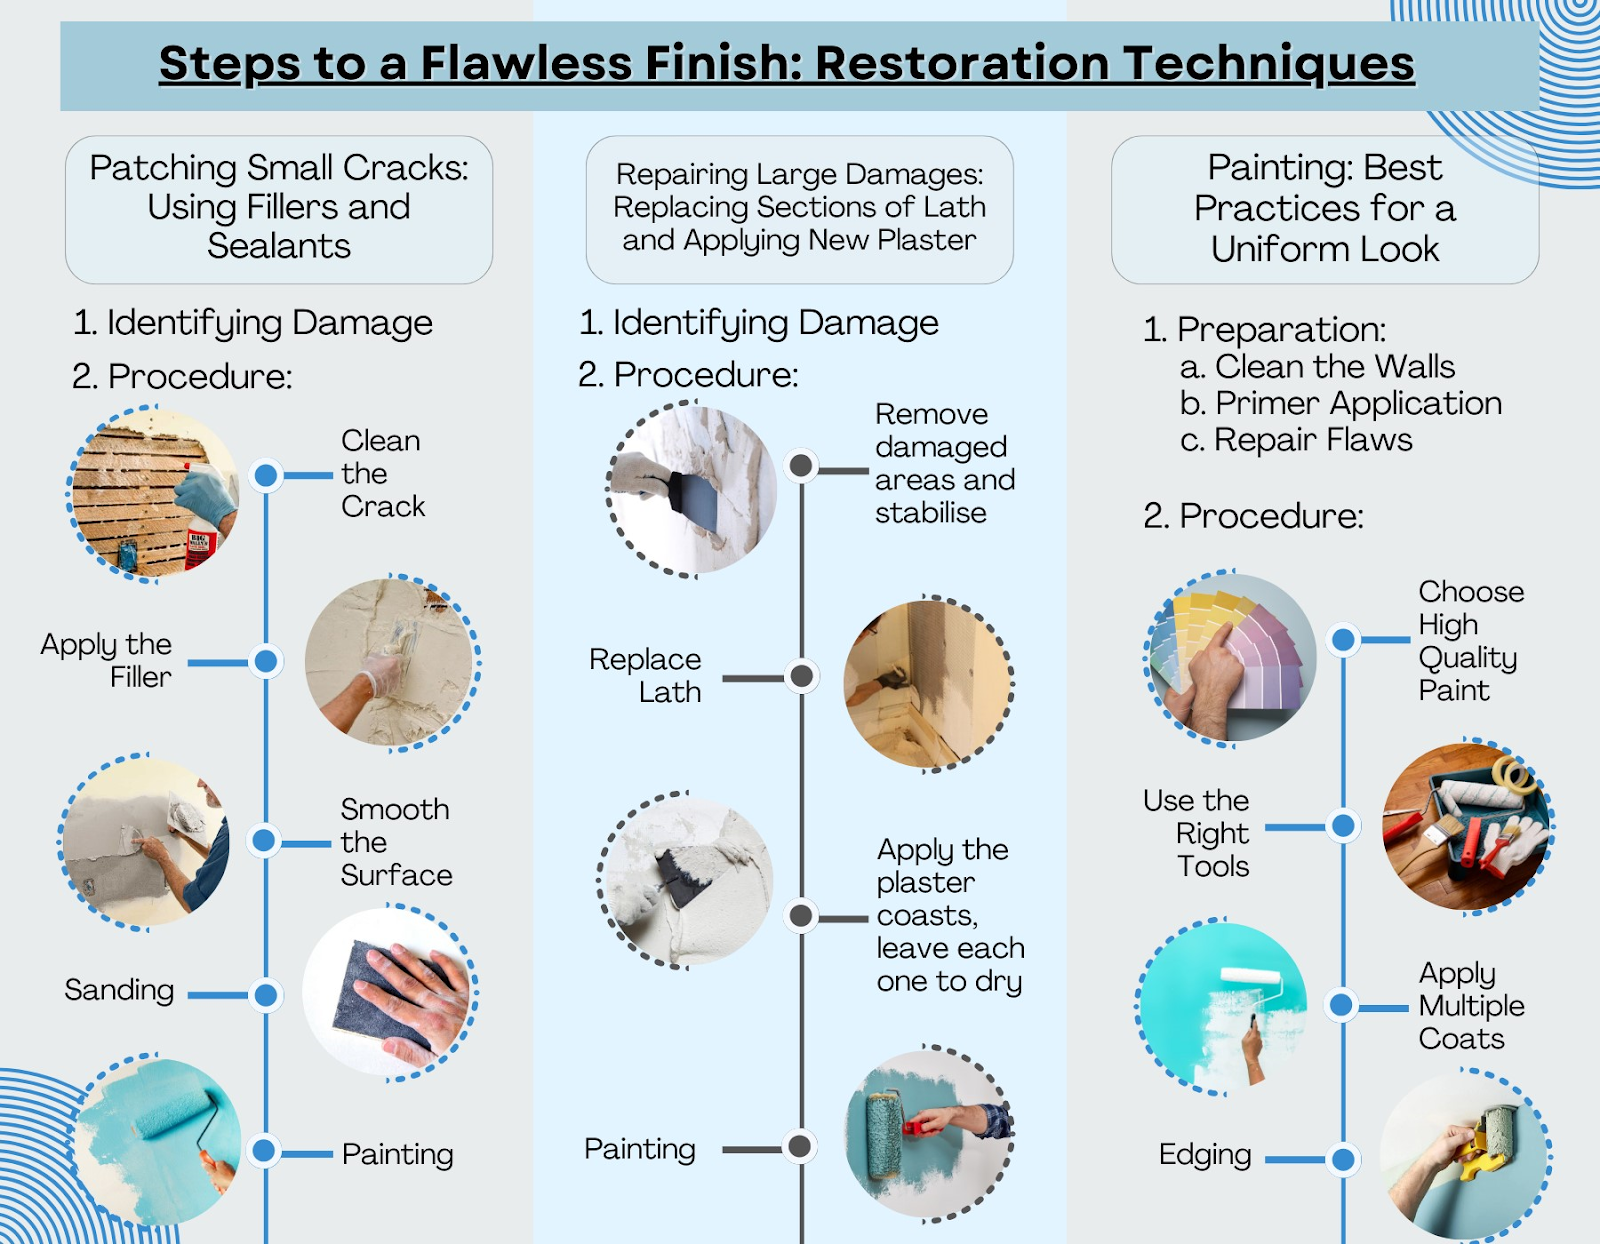
Patching Small Cracks: Using Fillers and Sealants
Identifying Damage
Before commencing any repair, inspect the lath and plaster walls for minor cracks and damages. Ensure the damage hasn’t penetrated deep, destabilizing the laths behind the plaster.
Procedure
- Clean the Crack Ensure the crack is free from loose plaster, dust, or debris for optimum adhesion.
- Apply Filler Use a lime-based filler to patch small cracks. This substance remains compatible with the existing lime plaster, maintaining the wall’s breathability and flexibility.
- Smooth the Surface Level the filled crack with a spatula or trowel to match the wall’s surrounding area. Allow it to dry completely.
- Sanding Gently sand the patched area to create a smooth surface.
- Painting If the wall is painted, touch up the patched area with a matching paint.
Repairing Large Damages: Replacing Sections of Lath and Applying New Plaster
Identifying Damage
If chunks of plaster are falling or the lath is visible or damaged, substantial repair is needed.
Procedure
- Remove Damaged Areas Cut out the damaged plaster and any deteriorated laths.
- Replace Lath Attach new wood laths or metal lath to the studs, ensuring they are secure.
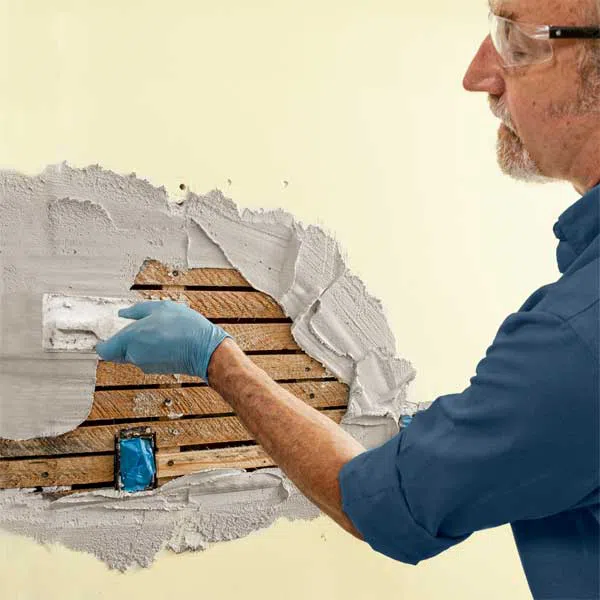
- Apply First Plaster Coat Apply a thick render layer to stick to the lath and fill the gaps. Utilize a mixture of lime putty and sharp sand in a 1:3 ratio, similar to historical methods.
- Apply Second and Third Plaster Coat Apply a ‘floating’ layer for smoothness and a ‘setting’ layer for a finished surface.
- Allow to Dry Let the plaster dry thoroughly before painting or wallpapering.
Engaging a professional is recommended for repairing large damages as the task can be complex and requires experience to ensure longevity and aesthetic appeal.
Painting: Best Practices for a Uniform Look
Preparation
- Clean the Walls Ensure the wall is free from dust, dirt, and grease. If needed, wash the walls and let them dry completely.
- Primer Application Apply a high-quality primer to the walls. This step ensures better paint adhesion and a more vibrant, lasting colour.
- Repair Flaws Before applying the paint, ensure all cracks or holes are properly filled and sanded to avoid an uneven appearance.
- Procedure:
- Choose High-Quality Paint Select a paint that is durable and has good coverage. The finish (matte, semi-gloss, etc.) depends on personal preference.
- Use the Right Tools Utilize high-quality brushes or rollers for an even application.
- Apply Multiple Coats Apply at least two coats of paint for a uniform look, allowing sufficient drying time between coats.
- Edging Use painter’s tape to ensure clean lines and prevent colour bleed into adjacent areas.
Conclusion
Lath and plaster walls are more than just an architectural relic; they are emblematic of an era where every detail mattered, and every structure bore the indelible mark of its craftsman. With careful attention to detail, the right materials, and a dash of patience, these timeless walls can be returned to their original splendour, continuing to grace our homes with their old-world charm. Whether you’re a homeowner seeking to rejuvenate a historic property or simply an enthusiast of classic architecture, understanding and mastering the restoration of lath and plaster is a journey into the heart of architectural artistry.
Image Source: https://www.thisoldhouse.com/walls/21016579/how-to-repair-plaster
(Photos by Ben Stechschulte)