Starting a home wiring project can feel confusing. Did you know the right size wire for 100 amp is crucial? This article will guide you on which tools are needed and how to install them safely.
Keep reading for helpful tips!
Understanding Home Electrical Wiring
Getting to know your home’s electrical wiring is key. You’ll learn about different wires, cables, and how to put them together safely.
Types of Electrical Wires and Cables
Wiring your home involves knowing about different wires and cables. Each type has its own use in the house.
- Non-Metallic (NM) Cable: This is the most common type used in homes for dry, indoor spaces. It has a plastic covering and holds multiple wires inside.
- THHN/THWN Wire: These letters stand for specific features like Thermoplastic High Heat-resistant or Wet conditions. Electricians use these in conduit pipes, often outside or in wet areas.
- UF Cable: Shortcut for Underground Feeder, this cable goes directly into the ground without needing a pipe. It’s perfect for outdoor lights or power to a shed.
- Coaxial Cable: Used mainly for TV and internet connections, this round cable carries data signals.
- Cat-5e/Cat-6 Cables: These are for internet and network wiring. They can handle more data, making them great for smart homes.
- Low-Voltage Wire: For doorbells, speaker systems, or security cameras, low-voltage wire is safe and easy to handle.
Each wire size matters too—for example, what size wire for 100 Amp service you need is thicker than what you’d use for simple lighting fixtures to ensure safety and functionality.
Now that you know about wires and cables let’s look at some tools you’ll need to work with them safely.
Common Electrical Wiring Techniques
Home electrical wiring includes several techniques to connect wires safely and efficiently. One common method is the “pigtail” technique. This involves twisting together wire ends and connecting them to outlets or switches.
It helps make strong connections that can handle power better.
Another technique is using conduit. This tube protects wires from damage and moisture. It’s often used in garages or outdoor areas where wires might be exposed to the elements.
Using cable ties keeps everything tidy, too! They help secure wires together, preventing tangles and hazards. Keeping a clean work area matters when dealing with electrical projects…
it makes things safer for you.
“Safety first—always check your connections.”
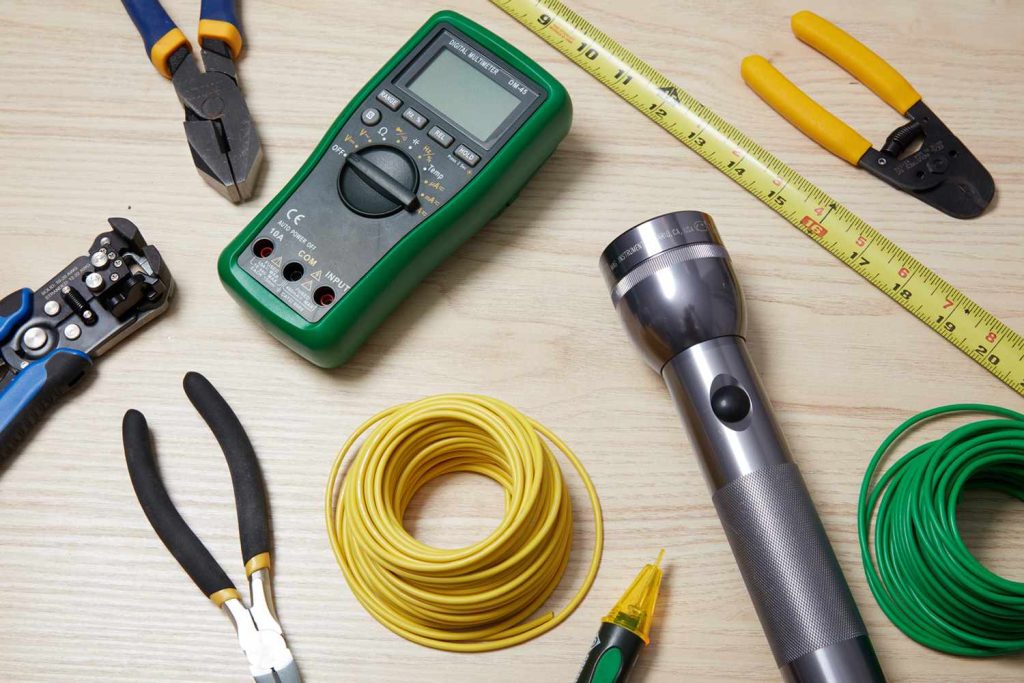
Essential Tools for Electrical Wiring Projects
When you work on electrical wiring, having the right tools is key. You’ll need items like wire strippers and a multimeter to get the job done quickly and safely….
Wire Strippers and Cutters
Wire strippers and cutters are key tools for any electrical job at home. Wire strippers help remove the plastic coating from wires. They let you expose the metal inside without damaging it.
This is important for making good connections.
Cutters make it easy to trim wires to the right length. They come in different sizes, so choose one that fits your work. Having these tools will ensure your wiring projects go smoothly.
Using wire strippers and cutters correctly saves time and helps avoid mistakes in your electrical tasks around the house.
Multimeter and Voltage Tester
Moving on from wire strippers and cutters, let’s talk about the multimeter and voltage tester. These tools are key for checking electrical systems at home. A multimeter measures voltage, current, and resistance.
It helps you see if wires are working right or not.
A voltage tester is simpler. It tells you if a wire has power flowing through it. Both tools keep you safe while doing electrical work at home. They help avoid mistakes that can cause shocks or fires.
Having these in your toolbox is a smart choice for any wiring project!
Screwdrivers and Pliers
Screwdrivers and pliers are key tools for any electrical project. Screwdrivers help you tighten or loosen screws on outlets and light switches. They come in many sizes. A flathead screwdriver works well for simple tasks, while a Phillips head offers more grip.
Pliers are just as important. Use them to twist wires together or hold things in place. Needle-nose pliers can reach tight spots easily. Keep these tools handy when working with home electrical wiring projects, like setting up circuits safely at home.
Step-by-Step Guide to Rough-In Electrical Wiring
Rough-in electrical wiring involves several key steps. You’ll mark where to place your boxes, drill holes, and run the wires… It’s hands-on work that gets everything ready for switches and outlets.
Marking Box Locations
Marking the box locations is a key step in your wiring project. It helps you know where to place switches and outlets.
- Use a Pencil or Marker
Grab a pencil or marker to mark your spots. A clear dot works best on walls. Make sure they are visible but easy to erase later. - Decide on Placement Height
Standard height for outlets is about 12 to 16 inches off the floor. Switches usually go around 48 inches high. Adjust based on furniture or other needs. - Consider Room Layout
Think about how you use the space. Place outlets near seating areas, workspaces, or appliances. This makes it easier to plug in devices. - Check for Studs and Pipes
Use a stud finder before making marks. Avoid placing boxes where studs or pipes are located. These obstacles can cause problems during installation. - Outline Box Shape
Draw the shape of the electrical boxes on the wall using your marks as guides. A square outline helps visualize where each box will go. - Check Your Work
Step back and look at your marks from different angles. Make sure everything feels right before moving on to drilling and cutting holes. - Double-Check Local Codes
Review local building codes for outlet placement rules. Following these rules ensures safety and compliance with regulations in your area. - Ask Others for Input
If you’re not sure about placements, ask family members or friends for their thoughts! Sometimes, another set of eyes can help spot issues you may have missed. - Start Planning Wiring Routes
Think ahead about how you’ll run wires between boxes too! This can save time later when connecting everything together.
Doing it right now will make the installation smoother later on… Take your time marking those locations!
Drilling and Running Cables
Drilling and running cables is a key part of electrical wiring. It helps in connecting your circuits safely.
- Choose the Right Drill Bit
Select a drill bit that matches the cable size. A bit that is too big can damage the walls, while one that is too small may not fit the cable. - Locate the Studs
Use a stud finder before you start drilling. This tool helps you avoid hitting pipes or wires inside the wall. - Mark Your Points
Make clear marks where you want to drill holes. These spots should be neat and easy to see. - Drill Holes at an Angle
Drill your holes at a slight angle toward the floor. This makes it easier to run cables later on. - Run Cables Through Holes
Carefully push your cables through each hole you drilled. Ensure no kinks form in the wire as it passes through. - Secure Cables with Staples
Once your cables are in place, use staples or cable clips to hold them against beams or studs. This keeps everything tidy and safe. - Check for Proper Length
Make sure to leave enough length on both ends of the cable for connections at switches and outlets. - Avoid Overcrowding Cables
Don’t run too many cables together in one spot. Grouping too many can create heat and fire hazards. - Plan Your Route Carefully
Always plan out how you will run your wires from one location to another before drilling any holes. - Review Local Codes
Check local building codes for proper methods of running electrical wiring in walls and ceilings; this ensures safety and compliance with regulations.
These steps pave a smooth path for efficient home wiring tasks… making electrical work safer!
Wiring Switches and Outlets
Wiring switches and outlets is a key part of home electrical work. It can be straightforward if you follow these steps.
- Turn Off Power
Always turn off the power at the circuit breaker. You don’t want to get shocked while working. - Gather Materials
You need a switch or outlet, wire, and electrical tape. Make sure to have everything ready before starting. - Strip the Wires
Use wire strippers to remove insulation from the ends of your wires. Strip about ¾ inch from each wire. - Connect Wires to Switches
For a switch, connect one wire to the top terminal and another to the bottom terminal. The white wire goes to the silver screw, while the black wire connects to the brass screw. - Attach Wires to Outlets
An outlet has two screws for wires: one for hot (black) and another for neutral (white). Connect the black wire on the right side and the white on the left. - Grounding Wires
Ground wires are usually green or bare copper. Attach this wire to a green screw on both switches and outlets for safety. - Secure Everything
Push all wires back into their boxes carefully. Do not pinch any wires when you place covers back. - Test Your Work
After wiring, turn your power back on at the circuit breaker. Use a voltage tester to ensure everything works right before using any new switch or outlet. - Close Up with Plates
Finally, attach wall plates over your switches and outlets for protection and a clean look.
Working with home electrical wiring can be fun if you take it step by step! Make sure you stay safe every time you work with electricity at home too!
Safety Precautions When Working with Electrical Wiring
Always check the voltage before you touch any wires. This simple step can save you from serious harm. Use insulated tools and wear proper safety gear too. Safety is key! Want to know more? Keep reading for all the details!
Checking Voltage Before Touching Wires
Checking voltage is key before touching any wires. This step keeps you safe from shocks and injuries. Use a multimeter or a voltage tester to check for live wires. Make sure the device works correctly before using it.
Turn off the power at the circuit breaker first. Then, test the wire to see if there is any current flowing through it. If you detect voltage, do not touch that wire yet. Follow these steps diligently to ensure safety during electrical projects at home.
Using Insulated Tools and Wearing Protective Gear
Insulated tools are a must for electrical work. They help keep you safe from shocks. These tools have special coatings that protect against electricity. Use wire strippers, screwdrivers, and pliers with insulation.
This extra layer can make a big difference.
Protective gear is also important. Wear rubber gloves to shield your hands from injury. Safety glasses will protect your eyes from debris. A hard hat helps if you’re working overhead too.
With the right tools and gear, you can work safely on home electrical wiring projects… now let’s look at some essential tools for these tasks!
Conclusion
Home wiring can be enjoyable and beneficial. With the right tools, you can make it secure and straightforward. Be sure to follow safety rules while you work. Get your wire strippers, multimeter, and screwdrivers ready! Enjoy enhancing your space in your home! For more tips and guides, visit https://www.how-what-where-when.com